Easy, Cheesy Burgers

These are super easy to throw together, and my omnivorous family thinks they taste great! My take on homemade beef burgers.

Ingredients:

  • 1 1/2 lbs lean ground beef
  • 1/4 to 1/2 cup onion, finely chopped
  • 1/2 cup soft cheese of your choice (cheddar, pepper jack…)
  • 1 tsp dried basil
  • 1 tsp dried oregano
  • 1 tsp soy sauce
  • 1 tsp Worcestershire sauce
  • 1 egg

Grease your grill, and preheat it to high heat.

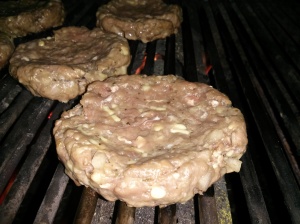
Mix all of yor ingredients in a bowl until well combined, I recommend using your hands for this no matter how gross, and then form into 4 or 5 patties. Tip for getting them not to shrink is to form them into disks, then make an indent in the center, raising the edges. No shrinkage!

IMG_20140424_191029

Grill for 5 minutes a side once the grill is hot, and serve however you like them!

IMG_20140424_192446

-Happy Cooking!


Boozy Pina Colada Cupcakes

Lazy Saturday afternoons are 100% made for relaxing, doing chocolate sea-salt body scrubs, and making Boozy Pina Colada Cupcakes! I whipped these babies up for a house warming party tonight, and while I won’t eat them (alcohol ain’t my thing), I feel fancy bringing them!

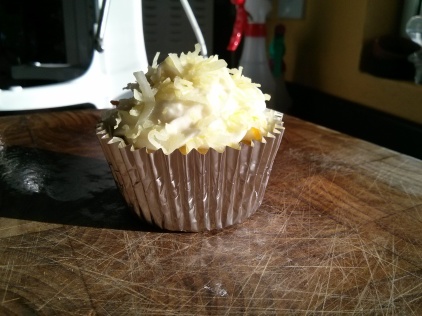
Image

They’re super simple!

Ingredients:

Cupcakes:

  • 18.25 oz box yellow cake mix
  • 20 oz can crushed pineapple in juice, not drained

Frosting:

  • 8 oz cream cheese, softened
  • 1/2 cup butter, softened
  • 2-5 cups confectioners sugar
  • 1 tbsp dark rum
  • 1 cup coconut flakes
  • 3 drops yellow food colouring (optional)

Let’s begin! Combine the cake mix and pineapple in a mixing bowl, and portion out into 24 cupcakes. Bake at 350 F for 18-25 minutes. They will be super moist, so be careful when you’re doing a toothpick test, or bits of pineapple may come out in. If they do, put them back and they’ll stick there fine 😛

For the frosting, cream the cream cheese and butter with a stand mixer or hand mixer, then whip in the rum. Add the confectioners sugar in cups until you get the desired taste and consistency. Once well combined, beat it on high until it’s light and fluffy.

You can pipe it on, or you can just spoon it on, whatever floats your boat! I piped it on for a fancier look. Now add the coconut! I mixed mine in a baggie with the food colouring for a bit of depth to the presentation, but you don’t need to. Sprinkle it on the cupcakes! Refrigerate them until it’s time to serve, and you’re golden! You don’t have to put the rum in if you’re serving to kids or people who don’t do alcohol, but it adds a fun spin!

Image

-Happy Cooking!

Bonfire Cupcake

I’m 17 now. The whole birthday thing happened yesterday. *Hiss*. That’s me showing my distaste for birthdays and growing up and all that jazz. Okay, now I’m going to ignore the fact that I’m another year older and tell you how much fun I actually had on my birthday, and how well my cupcakes (instead of a cake) turned out! I didn’t have much of a party, just a bonfire in my backyard, so I thought I wouldn’t be able to do any cool food, but I really wanted to do something, and bonfire cupcakes ended up being the solution! You can use any cupcake base for these, it’s just the cool icing that was the point, but I went with a low-fat pineapple cupcake, because YUM. I pulled them off of Skinnytaste, and they were absolute magic!

Image

Ingredients (for the icing):

  • any kind of stiff icing, I used a store bought one which had to thicken up with icing sugar
  • red and yellow liquid food colouring (really good food colouring would make your life a lot easier though)
  • chocolate dip (chocolate chips, butter, milk) [optional but recommened]
  • pretzel sticks

Once you’ve made your cupcakes, let them cool COMPLETELY, otherwise the icing will melt off. Seriously, like a few hours at least.

While they’re cooling, mix lots of yellow and not so much red food colouring into a tub of icing until it becomes a nice bright orange, a few drops at a time. If you’re using storebought icing, you’ll probably need to thicken it with icing sugar like I did, but kudos if you have a really good buttercream or creamcheese icing that you can use!

Put the 2/3 orange icing into a piping bag with a medium star tip on it and pipe it in a swirl going from the outside of the cupcake, in, finishing it of with a little flourish at the tip! It helps piping if you keep the bag at a 45 degree angle.

Add red food colouring to what’s left over of your orange icing until it becomes bright red. Dip a toothpick into the icing and stripe it along the “flames” of icing already piped on. You can run the toothpick flat against the icing,and it will get several stripes at once, and don’t be afraid to make lines in the plumes of “fire” because it will just help it look even more realistic!

Image

If you’re dipping your pretzel sticks in chocolate, melt chocolate chips in a double boiler, and add little bits of butter and milk until it becomes liquid and shiny (I didn’t really pay attention to detail here I just eye-balled, sorry guys). Dip the sticks into the melted chocolate, and put them in the fridge or freezer to set on a sheet of parchment paper. When ready to serve, prop three sticks in a teepee shape on top of the icing, and voila! You have a delicious little bonfire. The chocolate pretzels really are delicious. They taste like chocolate wafers!

Image

These are great for bonfire night or the 4th of July, or Canada day, or any time when you have a bonfire, really! Or any time at all I mean, seriously, they’re cupcakes!

-Happy Cooking!

Zucchini Carrot Bread

I wanted to bake something new, delicious, and mostly healthy today, so I set out on a crusade to find something. Half way through trolling the web, I remembered I had half a zucchini left, and my dad had bought a ridiculous amount of carrots that needed using up (seriously, like 6 bags), so I started looking around for a carrot zucchini bread, and I lucked out, finding an awesome recipe on the Betty Crocker website! It’s super moist, super flavourful, full ‘o veggies, and half whole wheat (I think it would be just as good full whole wheat, but I have a weird palate), so it’s not a bad snack at all!

IMG_20140507_160723

It’s meant to be baked in 8×4 inch bread pan for an hour to an hour and 15 minutes, but I wanted to try baking it in a large cake pan, to make for slice thin bars and a shorter cooking time, and it worked so well!

Ingredients:

  • 3/4 cups shredded zucchini
  • 3/4 cups shredded carrots
  • 3/4 cups sugar
  • 1/3 cup vegetable oil
  • 2 eggs
  • 3/4 cups all-purpose flour
  • 3/4 cups whole wheat flour
  • 1 teaspoon baking soda
  • 1 teaspoon ground cinnamon
  • 1/2 teaspoon salt
  • 1/2 teaspoon ground cloves

It’s super easy to throw together!  Begin by preheating your oven to 350 F, and greasing your desired pan*.

Put your shredded veggies, sugar, oil and egg into a bowl and whisk together.

image (1)

Next, mix in the flours, baking soda, cinnamon, salt, and ground cloves (feel free to add more or less spices, depending on how much flavour you want, I added a little more clove) until combined.

image (3)

*Spread into a flat cake pan, about 9×12 inches, and bake for about 25 minutes, or until a toothpick inserted in the centre comes out clean. Mine is a silicone pan so it didn’t have to be greased at all.

OR

*Pour into a 8×4 inch loaf pan and bake for about 1 hour-1hour 15 minutes, or until a toothpick inserted into the centre comes out clean.

image (2)

My family and I (*cough* my sister and I *cough*) ate the first batch so fast that I had to bake another batch the same night! I recommend cutting off the four corner and hiding them, if you’re the baker! They’re crunchy and 100% the best part 😉

image


-Happy Cooking!