Quick, Creamy Broccoli and Chicken Casserole

IMG_20140613_142523

On days when I work, dinner is one of two things: 1) lentil stew I made early in the day and refrigerated or 2) anything I can find for me, and then something impromptu for my parents. I’m usually starving after of three hours with six-year-olds in a pool, teaching swimming lessons, and if I haven’t made anything I’m liable to eat breakfast food, like cereal or banana and peanut butter toast the second I walk in the door, which I did today, and then promptly realized that I had no clue what I was going to make for my dad. After rooting through the fridge on a hunt for ingredients I decided on what I wanted to make: Chicken and Broccoli Casserole.

I’d never made one before, and I’m in a let’s not use a recipe, let’s make this up as we go along phase, so I searched around the internet for about five minutes until I had enough general knowledge, and then set to work making my own recipe however I felt like making it. It was super easy, and turned out really well. My dad loved it! It’s enough to feed two people, or one really hungry dad, and can be very easily doubled, tripled, or how-ever-many-led, to accommodate for more mouths to feed.

Ingredients:

  • 2 (small-ish) boneless, skinless, chicken breasts
  • 1 cup of chicken or vegetable broth
  • 2 tbsp all-purpose flour
  • 3/4 cup grated cheddar cheese
  • 2 cups of broccoli florets
  • 1/2 cup seasoned bread crumbs
  • 1/2 cup grated parmesan

Preheat oven to 400 F, and spray a small casserole dish with non-stick spray.

Cut chicken into small cubes and season with salt and pepper, and fry in a pan with a little oil or nonstick spray until cooked through, about 4 minutes per side. Meanwhile, stir flour and broth together in a small sauce pan until well mixed, and then bring to a boil, whisking constantly. Once bubbles form, continue whisking until it’s thick enough to coat the back of a spoon, and then remove from heat and stir in salt and pepper to taste. Add the cheddar and mix until melted.

Pour the mixture into a bowl and add the broccoli florets and chicken, and toss to coat. Spread the mixture into the casserole dish, and evenly sprinkle on the bread crumbs and the parmesan.

Bake, covered in foil, in preheated oven for 15 minutes, or until bubbling, then remove the foil and turn on the broiler in your oven, and continue to cook for 4-5 minutes to brown the top. Remove from the oven and let it sit for 5 minutes or so, then serve!

–Happy Cooking!

Easy, Cheesy Burgers

These are super easy to throw together, and my omnivorous family thinks they taste great! My take on homemade beef burgers.

Ingredients:

  • 1 1/2 lbs lean ground beef
  • 1/4 to 1/2 cup onion, finely chopped
  • 1/2 cup soft cheese of your choice (cheddar, pepper jack…)
  • 1 tsp dried basil
  • 1 tsp dried oregano
  • 1 tsp soy sauce
  • 1 tsp Worcestershire sauce
  • 1 egg

Grease your grill, and preheat it to high heat.

Mix all of yor ingredients in a bowl until well combined, I recommend using your hands for this no matter how gross, and then form into 4 or 5 patties. Tip for getting them not to shrink is to form them into disks, then make an indent in the center, raising the edges. No shrinkage!

IMG_20140424_191029

Grill for 5 minutes a side once the grill is hot, and serve however you like them!

IMG_20140424_192446

-Happy Cooking!


Mexican Lasagna Rolls

It’s my mum’s birthday today–how cute is it that my ‘rents’ birthdays are only 11 days apart?!–so I wanted to do something nice for dinner. I racked my brains all of last night, and scoured the internet, until I settled on lasagna rolls, which I had been wanting to try for a while. The only problem was, the only ingredients I really had for a traditional lasagna were the noodles, so I had to figure out something different. I searched the internet for ricotta-less recipes, and mozzarella-less ones, or marinara sauce-less ones, to be honest, and I really couldn’t find any which I had all the ingredients for, and I didn’t want to ask either of my parents to go to the grocery (let’s not forget I’m not even 17 and don’t have or want a drivers licence yet), so I kind of came up with my own. The only thing I really took from other recipes were the amount of time to cook the rolls, and what temperature, so I’m proud to say this is my first completely original recipe. Yay for Riley! (Joking, I was hoping so hard these would turn out well and my mum wouldn’t end up eating a grilled cheese sandwich for supper on her birthday.)

You’ll notice in the pictures that I started out making just half of the recipe, and used a round pan. I later learned of more mouths turning up tonight, and doubled it, getting the recipe below.

Ingredients:

  • 10 lasagna noodles
  • 2 chicken breasts
  • salt and pepper to taste
  • 4 tsp olive oil
  • 1 1/2 cups 0% Greek Yoghurt, divided
  • 1 1/2 cups medium or hot chunky salsa, divided
  • 1 tsp cumin
  • 1 tsp chilli powder
  • 3 cups grated cheddar cheese, divided
  • 1 cup grated parmesan

Some lasagna recipes say to use dry noodles (obviously not this one, because they need to be rolled), and some say to boil them to almost cooked, but I like to take the long route and soak mine. I’m a pain in the butt like that. Place your noodles in a large baking dish and cover them with cool (not ice cold, c’mon people) water.

.Image

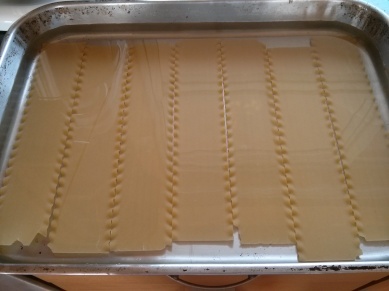
Leave them for about 1 hour until soft and pliable. I find this gives them a nicer texture, but you can boil them if you can’t get to your kitchen within 1 hour of your meal. I will warn you, though, that this is not a quick meal. I don’t like quick meals. I have a lot of time on my hands and cooking is therapeutic to me, so I like to draw it out. If you want to do these quickly sometime, make them a day ahead and place them in the fridge, covered in cling-film, and then pull them out when it’s time to cook ‘em.

While your pasta is soaking, you should cook your chicken. It’s gonna need to be shredded for this recipe, so you’ll need a little bit more time. Cut your chicken breasts into strips, and season with salt and pepper, then cook them in a pan with olive oil in it, on medium-high, for about 3 minutes per side, or until cooked through. You be the judge of the doneness of your poultry. When they’re finished, you can shred them with two forks, or you can do like me and wait for them cool for a couple minutes and then just pull them apart with your fingers. Set your shredded chicken aside until it’s needed.

Image

For this lasagna sauce, I went more Mexican than Italian, because I had more Mexican ingredients on hand. As I said, it wasn’t exactly last minute, but I don’t have a driving licence, and I didn’t want to ask my mum to take me to the grocery on her already busy birthday, so Mexican it was.

Now may be a good time to preheat your oven to 450 F.

Mix a cup of Greek yoghurt (or you could use sour cream, I suppose), and 1 cup of salsa in a medium bowl, then mix in your chilli powder and your cumin. I used hot salsa, and it wasn’t too spicy because the Greek yoghurt balanced it out nicely, but if you use medium, you might want to add maybe a 1/4 teaspoon more chilli powder and cumin, just to give the dish more umph. Or not. Whatever you feel comfortable with 🙂

Add your shredded chicken and 2 cups of cheddar cheese to the mixture, and stir to combine.

Lay your softened lasagna on paper towels, or a dish towel, and pat them dry, then get ready to rock n’ roll (I’m sorry, that was cheesy… no pun intended… I’ll be quiet now).

Mix your remaining Greek yoghurt and salsa, and make a bed for your roll ups in a casserole dish.

Spoon out your filling evenly onto the noodles, then carefully roll them up, avoiding spillage, and place them in the saucy bed, seam down. Sprinkle them with the remaining cup of cheddar cheese, parmesan, and a little bit of black pepper.

ImageImage

If you’re doing these ahead of time, cover them with cling film and place them in the fridge, for no more than a day. If you’re doing them right away, tent with foil, then bake in the preheated oven for about 20 minutes, then remove the foil and cook for about 15 minutes, or just until the cheese on top browns. Remove the pan from the oven, and let the lasagna rest for about 5 minutes, then serve! A salad on the side would be great, and maybe some good bread, with garlic butter.

I 1000% forgot to take a picture of this when all ten came out of the oven (sorry!), but they looked great, and my family loved them! Very easy to half the recipe (as you can see) if you’re only making for a couple of people.

-Happy Cooking!

Lighter Chicken Alfredo Pasta

With not much time left to thaw out whatever meat I planned to use for dinner today, I had to come up with something fast. I was having a hard time figuring out something that hadn’t been eaten here in a while, then I had a thought–hey, pasta!

Yes, my first pasta post is here, and it’s a healthy one too! I searched around for a bit to find a “lightened up” alfredo sauce, because while almost everyone loves the flavour of alfredo (me excluded… :P), it is basically made from cream, cream cheese, and butter. Not the healthiest dinner, especially when layered over a plate of carbolicious pasta. Made my way though, with lighter, but identical tasting alfredo, whole wheat pasta, and chicken breast, it’s actually great! If you want this to be vegetarian, use vegetable broth and leave out the chicken, and if you want it to be vegan… well I pretty much don’t think alfredo can actually become vegan. Using soy milk and vegan cheese could be a cool experiment though. I’ll converse with some vegan family members, and see if they’re willing to be guinea pigs 😀

Ingredients:

  • 2 boneless, skinless chicken breasts
  • 2 tbsp dried rosemary (roughly)
  • 2 tbsp olive oil, divided
  • 12 ounces of whole wheat pasta
  • 4 cloves of garlic, minced
  • 1 cup chicken broth
  • 1 cup lowfat milk
  • 3/4 cup grated Parmesan cheese (I used lower fat)
  • salt and pepper to taste

This scrumptious dish can be made in about 30 minutes, so be ready to be blown away!

I caramelized my chicken breast first, and then threw it back into the pan to heat up towards the end. Cube your breasts, then add to a pan with a tablespoon of olive oil and some rosemary sprinkled over the bottom. Cook the chicken for 2-3 minutes on one side until about halfway cooked from the bottom up, then sprinkle the chicken with more rosemary and flip it over to finish cooking.

Cook your pasta however your package tells you, making sure to salt your water, and while that’s going on, get to making your sauce!

Heat your olive oil in a medium sized pot, over medium heat, and then cook your minced garlic until fragrant. Add your flour and stir to combine, and cook for a minute to make sure you get the raw flour taste out. Whisk or stir in the chicken broth until smooth, then whisk in the milk until smooth. Bring it to a simmer, then cook for a minute. Add your Parmesan cheese, and cook for a minute.

Reduce heat to medium-low, if your pasta isn’t ready yet, but if it is, drain pasta well, return it to your pot, and then add the alfredo sauce. Portion out your pasta, and top with caramelized chicken breast.

Image


-Happy Cooking!

(Clean) Thai Chicken

It’s a busy Monday, and I figured it’d be nice for my mum and sister to come home from work and school to a healthy, delicious lunch. My sister is an avid gym goer, and a health nut, so the healthy part wasn’t really optional, but she, like me, is a very picky eater. Prior to coming down here, I had been scouring the web, looking for healthy food which I could make for her, which she would actually eat, which was quite difficult, but I did have some luck, so here is the first of many clean recipes to come over the next two weeks: Clean Thai Chicken.

Ingredients:

2 teaspoons natural creamy peanut butter
2 tablespoons and 2 teaspoons soy sauce
2 tablespoons and 2 teaspoons lemon or lime juice
1 teaspoon brown sugar
2 teaspoons curry powder
1/2 clove garlic, chopped
1/4 teaspoon hot pepper sauce
2 skinless, boneless chicken breasts, cubed

In a tupperware container, combine peanut butter, soy sauce, lime juice, brown sugar, curry powder, garlic and hot pepper sauce. Place the chicken breasts in the marinade and refrigerate. Let the chicken marinate at least 2-4 hours.

Image

Preheat a large pan to medium high heat, and spray with non-stick spray. Put the chicken on skewers (I got five… after I cut them a bit to be small enough to fit into the pan), and cook for 5-7 minutes on each side.

Image

My mum and my sister loved these. A successful lunch!

-Happy Cooking!

Mini Chicken Pot Pies

I’m leaving for the Caribbean on Sunday, so I figured I’d do up one more recipe for my grandpa before I head down, and throw it into the freezer. This one is a bit easier than the beef pot pies I did before, but just as flavourful and comforting. And cute and tiny. But with no pesky left over filling!

I used the extra pie crust I made double of and froze for the beef pot pies, but just in case you didn’t see that post, here it is. Go ahead and use the same pie crust method, or buy a frozen one.

Ingredients:

  • 2 boneless, skinless chicken breasts
  • vegetable oil
  • 1 (10 oz) can of cream of chicken soup
  • 1 and a half cups of mixed frozen vegetables, thawed
  • a few teaspoons of dried rosemary.

Begin by prepping your pie crust, and then set aside.

To cook the chicken, dice it into about 2 cm square cubes and fry with a little bit of vegetable oil and a pinch of rosemary in batches in a large skillet. Please do not over crowd the pan, just be patient, and cook your chicken in 2 or 3 batches. 

Image


When you’re finished each batch, set it on a plate covered in paper towel to drain off any excess oil, and pat dry.

Image


Once you’re done that, put a teaspoon of rosemary in a bowl, and combine it well with the canned soup, the vegetables, and the chicken. I found this method easier than putting the dry ingredients into the pies first, then layering the soup over them, as I had a hard time not ripping the pastry while combining them, what with the small crusts.

Image


Distribute evenly between the crusts.

Image


Use remaining crust dough to cover the pies, and crimp the edges with a fork, and put slits in the top.

Image


Now, bake in an oven preheated oven at 400 F for 35 minutes, or freeze and then cook, thawed (which will take all day, so take it out in the morning) whenever you have a hankering for chicken pot pie.

Image


-Happy Cooking!

Asian Spiced Pork Chops

Back at it the meat making for my grandpa tonight. Cooking is relaxing, what can I say!

Image

(I’m doubling the recipe to make enough for two people, although I only cooked for one)

Ingredients:

  • 2 pork chops, about a half inch thick
  • half cup of your favourite broth
  • half cup button mushrooms, sliced
  • 2 tbsp red wine vinegar
  • 1 tbsp soy sauce
  • 1 tbsp honey
  • pinch of red pepper flakes
  • 1 tsp olive oil
  • 2 tsp sesame seeds
  • 2 cloves minced garlic
  • 1 tsp powdered ginger

Method:

Bring the broth to a boil in a small saucepan. Add the mushrooms, and simmer over low heat for about 10 minutes.

In a small bowl, stir together the vinegar, soy sauce, honey, 1 tsp sesame seeds, and red pepper flakes, then set aside.

Heat the olive oil and remaining 1 tsp of sesame seeds  in a large non-stick skillet over medium heat. Add the pork chops, and brown for about 2 minutes on each side. Add the garlic and ginger; cook and stir until you can smell the garlic. Stir in the soy sauce mixture, and bring to a boil. Reduce the heat to low, and simmer for 5 minutes, uncovered.

Stir the mushrooms and chicken broth into the pan with the pork chops, and simmer uncovered over low heat until the sauce has reduced by about 1/3, and the pork chops are cooked through.

To serve, place pork chops onto serving plates, and spoon equal amounts of the mushroom sauce over them. My grandpa really loved this one, guys!

-Happy Cooking!

Beef Pot Pies (Yes, two!)

As I’ve mentioned, I don’t do meat, so I was pulling out the latex gloves for this recipe, requested by my grandpa. Only until the touching of the raw meat was done, then I was good 😛

Because there is only one meat eater here, I made these small, so a whole pie isn’t sitting in the fridge for days after it’s been made. Therefore, I ended up with two adorably small pies. Image

Seriously, how cute are they?!

Anyway, I started off with a home made crust for these, but you can use a store bought one. I like doing things from scratch though 🙂

Crust Ingredients:

  • 1 1/4 cups all-purpose flour
  • 1/4 teaspoon salt
  • 1/2 cup butter, chilled and diced
  • 1/4 cup ice water

In a large bowl, combine flour and salt. Cut in butter until mixture resembles coarse crumbs. Stir in water, a tablespoon at a time, until mixture forms a ball. Wrap in plastic and refrigerate for 4 hours or overnight.

Roll out when you need it. I doubled the recipe and froze half for another time.
The recipe I found for this pie comes off my favourite food site, All Recipes, and I made one small change to it, just because I felt like it. I probably could have made it a little smaller, as I had a bit of left over filling, but not enough for it to matter. This is all I needed:
Image
It was pretty simple.
Filling ingredients:
  • 2 cups diced cooked potatoes
  • 1 (10 ounce) package frozen mixed vegetables, thawed
  • 1 1/2 cups diced cooked beef
  • 1 (10 ounce) can of cream of mushroom soup
  • 1/3 cup water
  • 1 teaspoon Worcestershire sauce
  • 1/2 teaspoon dried thyme leaves, crushed
  • 1/2 teaspoon dried rosemary leaves

To cook the beef, I cut it in small chunks (maybe 2 square centimetres?) and browned it in a pot with a couple teaspoons of canola oil, and I just boiled the potatoes until tender.

Put the potatoes, vegetables, and beef in a bowl and mix, being careful not to crush the potatoes. Image

Next, mix the soup, water, thyme, rosemary, and Worcestershire sauce in a second bowl. It will make a very thick sauce, which you will spoon over the mixture, after you have spooned it evenly into the pie crusts.

Image

Image

I made sure to carefully lift the beef, vegetables and potatoes to allow for the mixture to be spread evenly throughout the pie.

You will have lots left over with the crust recipe for this to cover the pies (after you cut off the excess and re-roll it), so roll it out and place over the pies, crimping the edges with a fork and making slits in the top.

Image

I froze mine so my grandpa can make them when he wants to, but if you’re doing them right away, bake them in a 400 F oven for 35 minutes, or until the crust is golden.

Image

 Update:

Papa loved the one he had for supper tonight. Cooked up beautifully!

IMG_20140227_185507 IMG_20140227_184834

-Happy cooking!